Mountain Lion Setup, Part 1 : Upgrade Lion
MacBook Pro with Lion arrives, before installing any other software apply for the Up-to-Date Programme for free a mountain lion upgrade.
Once you have completed the form acceptance email should arrive in about 5 minutes. One email contains a link to a document and the other email contains the password. Once opened the document contains the redemption code.
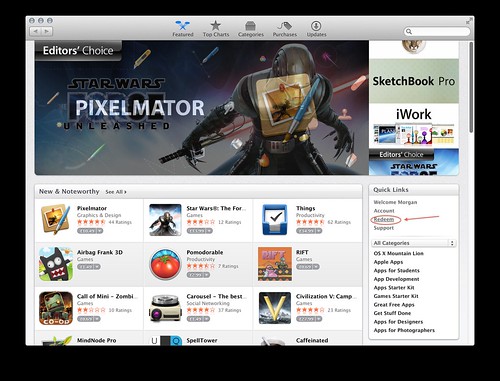
To redeem upgrade code, /Applications/App Store.app -> Featured -> Quick Links, Redeem
This will Result in a 4.1GB temporary app called /Applications/Install OS X Mountain Lion.app Once finished downloading this will prompt you to run. Which will install Mountain Line reboot and complete the installation and remove the temporary app.
[Optional] Note: As XCode no longer ships with command line tools and the gcc that can be installed with it is not compatible with compiling ruby, Xcode is no longer required for Ruby Development.
I then also got Xcode 4 from the app store but have not ran it yet to install the command line tools, this app was:
1.7G /Applications/Xcode.app \[\\Optional\]
My disk usage looked like this after a Lion to Mountain Lion upgrade with only the xcode 4 app installed:
 29G     /

5.0G	/Applications
2.5G	/Library
  0B	/Network
3.1G	/System
4.0K	/User Information
280M	/Users
259G	/Volumes
2.7M	/bin
  0B	/cores
4.5K	/dev
4.0K	/etc
1.0K	/home
7.8M	/mach_kernel
1.0K	/net
 17G	/private
1.5M	/sbin
4.0K	/tmp
360M	/usr
4.0K	/var
Report generated with $ sudo du -sh /*
[Optional] XCode is required for OSX and iOS development. Here is a useful page about the major changes in xcode 4.3. How ever if you only want to do Ruby development with RVM Then there are other tools required see Mountain Lion setup Part2
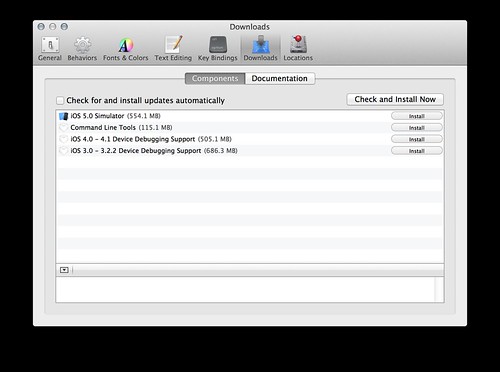
Run /Applications/Xcode.app, Once started from the Xcode menu goto File -> Preferences or press ‘⌘,’
Then select Downloads.
You should see Image below, Install the command line tools.
 [\Optional]
Apple Lion Mountain Lion 